
In today’s digital age, streamlining tasks and improving efficiency are key, especially when dealing with large sets of data. One such job that often comes up is creating personalized documents, like letters or labels, for a group of recipients. This is where the magic of mail merge comes in. In this guide, we’ll walk you through the process of how to perform a mail merge from Excel to Word, making it a breeze to generate tailored documents without the hassle of manual input.
But Hold on! If you’ve ever found yourself in a situation where you needed to create multiple personalized documents, such as letters or labels, you probably know how time-consuming and tedious it can be to manually input all that information. That’s where mail merge comes to the rescue!
To begin, let’s discuss what is mail merge so that you can easily understand its various steps of how to perform Mail Merge from Excel to Word. Furthermore, we will also discuss, the reasons why Excel users use Mail Merge. So let’s get started.
Related Article: An Ultimate Guide on How to Recover an Unsaved Excel File.
What is Mail Merge?
Before talking about the 7 steps of how to perform Mail Merge from Excel to Word, let’s discuss the meaning of Mail Merge.
Mail merge is a powerful tool that empowers you to create personalized documents by merging information from a data source (like an Excel spreadsheet) into a template document (in Word). Whether you’re sending out personalized letters, invoices, or any other mass communication, mail merge can save your time and ensure your accuracy so that you don’t have to retype the content again for every recipient.
For instance, Mail Merge is used to send festival greetings, employee birthday greetings, for sending company meetings, and important announcements.
Let’s say that you want to send New Year email greetings to all your friends and relatives. So instead of sending them one generic email, you can add their names to make it more personalized and special.
Just think! How does it feel when the messages you’ve received are directed and made for you? Do you feel good or overwhelmed?
But How? For doing this, you might have a question in mind: How to do this? Before any delay, let me tell you that this is possible with the help of the Mail Merge feature of Microsoft Excel.
So let’s dive into 7 effective steps of how to perform mail merge from Excel to Word. Furthermore, to understand with more clarity, Let’s send a Circular of the Annual General Meeting to shareholders of a company using the Mail merge feature of Microsoft Excel.
7 Steps on How to Perform Mail Merge from Excel to Word
In this guide, we’ll walk you through the process of how to perform a mail merge from Excel to Word in a simple and explained way. So, let’s get started.
Step 1: Prepare Your Data in Excel
Preparing the data in Excel is the first step of how to perform mail merge from Excel to Word. So before you begin the mail merge process, ensure your Excel spreadsheet is well-organized and contains all the necessary information. Each column should represent a specific data field, such as:
Column A: First Name
Column B: Last Name
Column C: Address
Column D: City
Column E: State
Column F: Country or Region
Column G: Company Name
Make sure you have a header row that labels each column mentioned above. This structured layout is crucial for the successful merging of data.
Here are some tips for preparing the data for a mail merge:
- The Excel spreadsheet should be stored on your local computer that is used in the mail merge.
- In the first sheet of your spreadsheet, all data to be merged is present.
- Make sure all data entries in cells with percentages, currencies, and zip codes are correctly formatted in the spreadsheet.
- Also, make sure the column names match the field names in your spreadsheet.
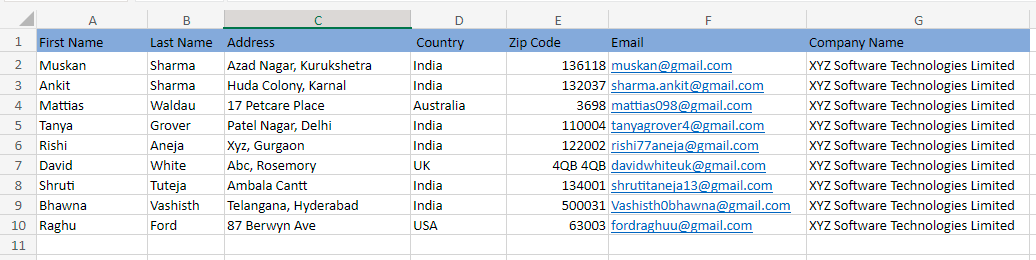
An image showing sample data in MS- Excel
Note: The data provided in the image is just sample data for explaining the points clearly.
Step 2: Create Your Document in Word
Creating the document in Word is the second step of how to perform mail merge from Excel to Word. To begin, open a new Word document and create the base document that you want to personalize. Furthermore, you can also open an existing document, if you have already composed a letter before.
For instance, if you’re sending a mass letter to your clients, draft the content of the letter, leaving placeholders for the data you’ll be merging. To insert placeholders, go to the ‘Mailings’ tab in Word and click ‘Insert Merge Field.’ This is where your Excel data will populate.
Step 3: Start the Mail Merge
This is the next step of how to perform mail merge from Excel to Word. Now in Word, navigate to the ‘Mailings’ tab and click on ‘Start Mail Merge.’
Choose the type of document you want to create, such as letters, envelopes, labels, etc. Select ‘Letters’ for our example.

An image showing the start mail merge options in Ms-Word
Moving further, Click on ‘Select Recipients’ and choose ‘Use an Existing List.’

An image showing the select Recipients option in Ms-Word
Now, browse and select your prepared Excel spreadsheet and click OK. After this, select the target sheet and tap OK.
Step 4: Insert Merge Fields
After adding the Recipient list, inserting the merge field is the next step of how to perform Mail Merge from Excel to Word. Now it’s time to insert the merge fields into your Word document. These merge fields will pull data from your Excel spreadsheet into your Word document.
- Place your cursor in the Word document where you want the data to appear.
- Click on the ‘Insert Merge Field’ that is present in the ‘Mailings’ tab.
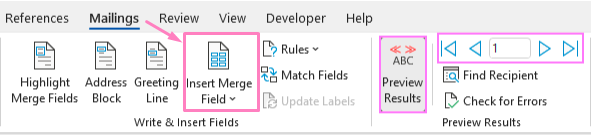
An image showing the Insert Merge Field option in Ms-Word
- Now, select the corresponding field from your Excel spreadsheet.
For instance, if you’re addressing recipients by their first name, choose the ‘First Name’ field. Now do the same for inserting other merge fields.
After completing, the result will look like this:

An image showing the document of Before Mail Merge in Ms-Word
Step 5: Preview Your Results
To ensure everything is in order, click ‘Preview Results’ in the ‘Mailings’ tab.
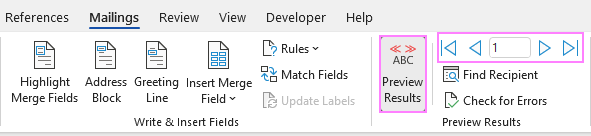
An image showing the Preview Results option in Ms-Word
This will display how each record from your Excel spreadsheet will look in the merged document. Use the arrow buttons to navigate through the records and make sure the data appears as intended. Previewing the result is another step of how to perform mail merge from Excel to Word.

An image showing the Preview Results in Ms-Word
The above-mentioned image shows, how the document will look after using the mail merge feature of Ms-Word.
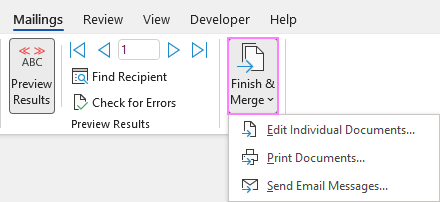
Step 6: Complete the Mail Merge
This is the second last step of how to perform mail merge from Excel to Word. To do this, preview the mail merge document, if the preview looks good, proceed to complete the mail merge:
- Click on the ‘Finish & Merge’ option available under the ‘Mailings’ tab.
- Choose ‘Print Documents’ to directly print the personalized documents, ‘Send Email Messages’ to email them, or ‘Edit Individual Documents’ to review and save them as separate Word files.
Step 7: Save and Distribute Your Merged Documents
Once the mail merge is complete, save your merged documents. This is the last step of how to perform mail merge from Excel to Word. In this, if you choose to edit individual documents, each one will open in a new Word window, allowing you to review and save them as needed. You can then print, email, or distribute the documents according to your requirements.
An image showing the last step of Finish & Merge in Ms-Word
And there you have it! You’ve successfully performed a mail merge from Excel to Word. This process can save your immense time and effort when dealing with a large number of personalized documents. Whether you’re sending out invitations, labels, or any other document type, mail merge is a powerful tool that can significantly streamline your workflow. By following all these steps provided in this guide in sequential order, you’re equipped to tackle mail merges with confidence and efficiency.
Remember! You can use the Mail Merge feature by using the Step-by-Step Mail Merge Wizard too. Now, let’s discuss about it.
Note: Do read our other blog to know 9 Effective Ways to Use Microsoft Excel in Business.
How to Perform Mail Merge from Excel to Word using Step-by-Step Mail Merge Wizard
Till now, we have discussed how to perform mail merge from Excel to Word using the options available on the ribbon. But you will be happy to know, that there is an option, with the use of it you can save your time more while doing your task.
The other feature is available in the form of Mail Merge Wizard. To use this feature.
- Go to the ‘Mailing tab’ available in the ribbon.
- After that go to the ‘Start Mail Merge’ option, this will further open up under the Mailing tab.
- Now, after clicking the option, a further dialog box will appear. After this, go to ‘Step-by-Step Mail Merge Wizard’.

An image showing the Step-by-Step Mail Merge Wizard option in Ms-Word
As soon as you click the option, the Mail Merge pane will open on the right side of your document which will walk you through the process step-by-step. In this, there are 6 steps, from starting the document to previewing the document.

An image showing the Mail Merge Pane in Ms-Word
| Note: The Step-by-Step Mail Merge Wizard option is very helpful for those who are using this feature for the first time. But if you already know about mail merge feature, you can use any of the ways to do mail merge. |
So this is all about the topic: how to perform Mail Merge from Excel to Word. Now, let’s discuss the reasons, why Excel users use the Mail Merge feature of Microsoft Excel.
Best 10 Reasons to Use the Mail Merge Feature of Microsoft Excel
Until now, we have discussed 7 effective steps of how to perform Mail Merge from Excel to Word. But do you think? Why use the Mail Merge feature of Microsoft Excel? If not, then let me tell you in the upcoming article you will get to know the best 10 reasons to use Mail Merge.
Certainly! Excel users often use Mail Merge for several reasons, as it’s a powerful feature that allows them to streamline and personalize the process of creating multiple documents, such as letters, envelopes, or labels. But here are the main reasons why Excel users use Mail Merge:
1. Bulk Communication
Mail Merge is particularly useful when you need to send the same content to multiple recipients. For instance, sending out personalized letters or emails to a large group of people, like customers, clients, or members.
2. Time Efficiency
Time Efficiency is the second reason to use the Mail Merge feature. Because manually creating individual documents for each recipient can be extremely time-consuming. With Mail Merge, you can generate a batch of personalized documents in just a few clicks, saving a significant amount of time.
3. Personalization
Excel users can merge data from their Excel spreadsheet into the documents. This means that each document can include personalized details, such as names, addresses, or account numbers, making the communication more relevant and engaging for the recipients.
4. Accuracy and Consistency
This is another reason for using Mail Merge as it reduces the chances of errors that can occur when copying and pasting information manually. The data is pulled directly from the Excel spreadsheet, ensuring accuracy and consistency across all the merged documents.
5. Automated Addressing
When creating documents like envelopes or labels, Mail Merge can automatically input recipient addresses from the Excel spreadsheet, eliminating the need to type them out individually.
Related Article: Learn 6 effective steps of How to Create a Clustered Column Chart in Excel.
6. Templates and Formatting
You can design a template document in a word processing program (like Microsoft Word) and then merge the data from Excel while retaining the template’s formatting. This ensures a professional and consistent look for all documents.
7. Custom Communication
Mail Merge allows users to create different versions of a document based on specific criteria. For example, you can send tailored offers to customers based on their purchase history.
8. Event Invitations and Announcements
When planning events or sending announcements, Mail Merge can help you create personalized invitations or notifications for your recipients.
9. Holiday Cards and Greetings
During holidays, you might want to send out personalized cards or greetings to friends, family, or colleagues. Mail Merge lets you add that personal touch without having to write each card separately.
10. Database Integration
Excel is often used as a database to store information. Mail Merge bridges the gap between this database and your documents, making it easy to pull in the required data.
So all these are the best 10 reasons that impels the Excel User to use the Mail Merge feature of Microsoft Excel.
Final Words
In conclusion, we can say that mastering the art of mail merging from Excel to Word can greatly enhance your productivity when dealing with large sets of data and personalized documents. By following these steps mentioned in the article, you’ll be well on your way to creating professional, customized documents efficiently and effectively.
In addition, how to perform mail merge from Excel to Word might seem complex at first, but with the help of the step-by-step guide provided above, you can surely create personalized documents more efficiently. Whether it’s sending out invitations, invoices, or any other form of communication, mail merge streamlines the process and ensures that each recipient receives information tailored to them. With practice, you’ll become adept at using this tool to enhance your communication tasks.
In this article, we have discussed what is mail merge, and various steps of how to perform mail merge from Excel to Word. I hope the information provided in the article will be helpful to you. But I assure you that through practice and exploration, you can become proficient in this and adapt it to suit your unique needs, ultimately saving time and reducing manual labor in document creation. For more related content on Microsoft Excel, do visit again.
Frequently Asked Questions (FAQs)
1. Can I use conditional statements in my mail merge?
Yes, you can use conditional statements to personalize your documents even further. For instance, you can set up a condition to display a discount message only for customers who have purchased a certain amount.
2. Is it possible to merge data from multiple Excel sheets?
Absolutely. In Step 2, when you select your data source, browse for the Excel workbook containing multiple sheets. You can then choose the specific sheet with the data you want to merge.
3. What should I do if some merge fields don’t display the correct data?
If you encounter issues with merge fields displaying incorrect data, ensure that the field names in your Excel sheet match the field names used in Word. Also, check for any leading or trailing spaces in the field names.