
How to Recover an Unsaved Excel File? Every Excel User faces the problem of various unexpected events, one among them is Losing an Unsaved File of Excel due to a power outage that shuts down your system. The Excel users work days and months on preparing reports, what if they get lost within a second? So, in that case, you don’t have to panic, What if there was a way to recover your data?
Just imagine that you have been working on a very important document in Excel for hours. Even if you are creating a very complicated graph, and suddenly the system crashes, the power goes off or you accidentally close an unsaved file. We know this is very frustrating, but don’t panic in this situation – you can easily recover your unsaved document. Because most of the time, the files can be retrieved. Furthermore, there are various methods for recovering unsaved Excel files.
In the upcoming article, you will get to know various methods of how to recover an unsaved Excel file, how to create a backup in Excel to prevent data loss, and various tips to prevent future data loss. So, let’s get started.
Note: Read our other blog to know about Best 5 Methods of How to Wrap Text in Excel.
Various Methods of How to Recover an Unsaved Excel File
There are various methods of how to recover an unsaved Excel file. So without wasting time, let’s dive into the main topic.
Method 1. Auto Save and Auto Recover Option
This is the first method of how to recover an unsaved Excel File, as by the use of the auto save and auto recover options in an existing file the Excel user can easily restore their Excel file.
The Modern versions of Microsoft Excel come equipped with AutoRecover and AutoSave features. But both these features of Excel are often misunderstood by the users, so let’s discuss what they mean.
Excel AutoRecover automatically saves versions of your file at specified intervals (such as 10 minutes), ensuring that even if Excel crashes, you can recover the file. If in any case, Excel crashes, you can access this temporary version using the steps explained below.
Do Remember! The AutoRecover option is active by default in Excel. But, if somehow, it is not active on your computer then do follow these steps:
- Go to “File”, after that go to “Options”.
- Now in the “Save” pane, make sure the option is ticked ‘Save AutoRecover information every’ and ‘Keep the last AutoRecovered versions if I close without saving’.
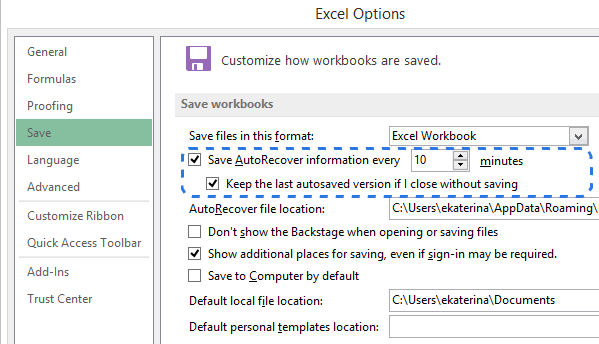
An image showing the AutoRecover option of Excel
- Now, you can also change the option of “when Excel should save this temporary version of your Excel file”. Well, the default time is every 10 minutes but you can change that as per your suitability.
| Tip 💡: In case of a crash or electricity failure, if you want to be more secure if you are working on important data, you should lower the time interval for saving information ( say 5 minutes). The more frequently the document is saved in Excel, the more chances you have to get all the changes back. |
On the other hand, Excel AutoSave constantly saves changes to your OneDrive or SharePoint account. It’s essential to have these features enabled to maximize your chances of recovering unsaved work.
You can just hit Ctrl + S to overwrite the previous version of your document. But if you forgot to do this, you can toggle on “AutoSave” on the top left side of the Excel interface. Furthermore, for your knowledge let me tell you that this feature will save every single change you make in your Excel spreadsheet automatically.

An image showing the AutoSave option of Excel
| 🗒Note: The Excel AutoRecover feature only works on Excel workbooks that have been saved at least once. But if you never save a document, and the computer crashes, then the Document Recovery pane won’t show up in Excel. |
Luckily, both the options of Excel auto save and auto recover files are turned on in Excel by default. But if you are not sure, you can easily check them up anytime.
Method 2. Check the Document Recovery Pane
How to recover an unsaved Excel file. Upon reopening Excel after a crash or an unsaved file incident, the Document Recovery Pane often appears, offering a lifeline to your lost work. This pane showcases documents that were open but unsaved during the last session. To recover your work:
- Open Excel, and if the Document Recovery Pane appears, simply click on the desired file to restore it.

An image showing the Document Recovery Pane of Excel
- But if the Document Recovery Pane doesn’t show up, navigate to the “File” tab, after that click “Info” in the left-hand menu, and select “Manage Workbook.”
- After that, you’ll find a list of recovered unsaved files that you can open and save.

An image showing Excel Document Recovery Pane Options
Method 3. Leverage the Temporary Files
This is the third step of how to recover an unsaved Excel File. To do this, when you’re working on an Excel file, temporary files are created as backups in case of unexpected shutdowns. To locate and recover these temporary files:
- First, make sure Excel is closed.
- Open the “Run” dialog by pressing the Windows key + R.
- Now type “%temp%” without quotes. This will open the Temporary Files folder.
- Within this folder, search for files that start with “Excel” or are named similarly to your unsaved file. These files may have random characters appended to their names.
- Now, Copy the temporary file you suspect to be your unsaved work to a different location, and then change its extension from “.tmp” to “.xlsx.” You can then open it in Excel and recover your lost content.
Method 4. Utilize AutoSaved Versions (Office 365 Only)
How to Recover an Unsaved Excel File? To recover a file in Excel, you can utilize autosaved versions of Microsoft Office 365.
For users of Office 365, Excel provides the option to save and recover versions of your work automatically to OneDrive. This is particularly useful in the event of a sudden disruption. To access your autosaved versions follow these steps:
- Open Excel, and then click on “File.”
- Select “Info” from the left-hand menu.
- Click on the “Manage Workbook” dropdown option, and after that choose “Recover Unsaved Workbooks.”
- A list of unsaved workbooks stored in OneDrive will appear. Click on the one you wish to recover and save it to your preferred location.
By following these steps, you can restore your unsaved Excel File in Office 365.
Related Article: A Complete Guide on How to Create a Pareto Chart in Excel?
Method 5: Utilizing AutoSave (For Cloud-Stored Files)
This is another method of how to recover an unsaved Excel file. An Excel user can utilize the autosave feature for cloud-stored files. To do the same, you can follow these steps:
- Open Excel Online: Go to the Microsoft Excel Online portal and log in to your Microsoft account.
- Access AutoSave: Once logged in, you’ll see the list of your recent files. Files that are actively being AutoSaved will have a small green checkmark next to them.
- Recover Unsaved Changes: Open the file with the green checkmark, and you will find a version history option. You can navigate through the versions and revert to the one before the accidental data loss.
Method 6: Recover using File History
This is another method of how to recover an unsaved Excel file. If an Excel user doesn’t use OneDrive (or didn’t keep the file in a OneDrive folder), still the user can recover a previous version of an overwritten Excel file. This can be done by following the upcoming mentioned steps such as:
- Right-click on your spreadsheet file. After that click on ‘File history’.
- Now, locate the version which you want to restore in the dialog box.
- Go to recovering unsaved Excel files or (only works on a previously saved Excel file).
- Moving further, click the ‘Open’ or ‘Restore’ buttons. Now you can choose what you want to do with the file.

An image showing Excel Version History Options
Did you find your file?
So, this is all about various methods of how to recover an unsaved Excel file. Let’s now discuss how to save a backup copy of a workbook.
How to Create Backup in Excel?
Till now, we have discussed various methods of how to recover an unsaved Excel file. Moving further, you can also recover your unsaved file if you create a backup. Certainly! Saving a backup copy of a workbook in Excel is a smart practice to prevent data loss. Here’s how you can do it:
- Open the Workbook: Launch Microsoft Excel and open the workbook that you want to create a backup copy.
- Go to the “File” Menu: Click on the “File” tab in the top-left corner of the Excel window. This will open the File menu.
- Choose “Save As”: From the File menu options, select the “Save As” option. This will open the Save As dialog box.

An image showing Backup Options of Excel
- Select the Location: Choose where you want to save the backup copy. You can save it to your computer’s hard drive, an external storage device, or a cloud storage service like OneDrive or Dropbox.
- Rename the File (Optional): It’s a good practice to rename the backup copy to indicate that it’s a backup. You can add “Backup” or the current date to the file name.
- Choose the File Format: In the “Save as type” dropdown menu, select the appropriate file format for your workbook. The default format is usually “.xlsx” for Excel workbooks.
- Click “Save”: Once you’ve chosen the location, renamed the file (if necessary), and selected the file format, click the “Save” button.
- Confirm Any Prompts: Depending on your settings and the features used in the workbook, Excel might show prompts related to compatibility or features that aren’t supported in the chosen file format. Follow any prompts as needed.
- Keep the Backup Safe: After saving the backup copy, make sure to store it in a safe location. If you’re saving it to a cloud storage service, ensure that it’s a folder you can easily access.
By creating regular backup copies of your Excel workbooks, you ensure that you have a secure copy of your data in case the original file gets corrupted or accidentally altered. This simple practice can save you a lot of stress and frustration in case of any unexpected issues.
Hold On! We know creating a backup of a spreadsheet helps with how to recover an unsaved Excel file in case of power failure. But despite this, there are various tips with the use of these various tips you can prevent future data loss. So let’s dive into it.
Also Read: 9 Effective Ways to Use Microsoft Excel in Business.
Tips to Prevent Future Data Loss
You might have a question in mind about how to prevent future data loss in Excel. While recovering unsaved Excel files is possible as we have already discussed various methods of how to recover an unsaved Excel file, but still prevention is always the best approach. Here are some tips to help you avoid such situations in the future.
1. Frequent Saving
Frequent Saving is one of the best tips to prevent data loss. So try to make a habit of saving your work at regular intervals. Use keyboard shortcuts like “Ctrl + S” (Windows) or “Command + S” (Mac) to quickly save your changes.
2. Use Autosave Feature
You can also use the autosave feature to prevent data loss. So to do this, take advantage of software features like AutoSave, which automatically save your work at set intervals. This feature is available in applications like Microsoft Office when working with cloud storage solutions.
3. Enable AutoRecover Feature
In programs like Microsoft Office, enable the AutoRecover feature. This ensures that backup copies of your files are saved at regular intervals, which can be crucial if the application crashes unexpectedly. This is a great tip to prevent future data loss.
4. Cloud Storage
An Excel user can store their files on cloud storage platforms like Google Drive, Dropbox, or OneDrive. These services often have built-in version history and file recovery features that can help you retrieve previous versions of your documents.
5. Version Control
If you’re collaborating on documents, use version control tools provided by many platforms. This allows you to track changes, revert to previous versions, and avoid overwriting important data.
6. Make Regular Backups
Make a habit of Backing up, and always back up your important files and documents regularly. You can use external hard drives, USB drives, or automated backup software to create copies of your data. Store these backups in a safe location so that you can access them anytime when needed.
7. Use File Naming Conventions
Develop a consistent and descriptive file naming convention. This makes it easier to locate and identify files, reducing the risk of accidentally overwriting or losing them.
8. Folder Organization
Organize your files into well-structured folders. This helps you quickly locate and manage your documents, reducing the chances of accidental deletion or misplacement.
9. Email Important Attachments
When working on critical documents, consider emailing them to yourself as attachments. This creates an additional backup in your email account.
10. Check Before Deleting File
Before deleting any files or folders, double-check to ensure you’re not removing something important. Use the “Recycle Bin” (Windows) or “Trash” (Mac) as a safety net.
11. Avoid Rushed Actions
Take your time when performing actions like file renaming, moving, or deleting. Rushing through these tasks can lead to mistakes and data loss.
12. Keep Software Updated
Regularly update your operating system and software applications. Updates often include bug fixes and stability improvements that can prevent unexpected crashes and data loss.
13. Protect Against Malware
Install and regularly update reliable antivirus and antimalware software to safeguard your computer from potential threats that could lead to data loss.
14. Use Strong Passwords
Secure your accounts with strong, unique passwords. This prevents unauthorized access that could result in data loss or theft.
15. Educate Yourself
Familiarize yourself with the features and settings of the software you’re using. Knowing how to recover autosaved or backed-up versions of your files can be a lifesaver in times of data loss.
By implementing these tips, you can significantly reduce the risk of future data loss and ensure the safety of your important files and documents. Remember that prevention is key, but having a backup plan in place can save you a lot of stress and frustration if the unexpected does occur.
Note: Do Read 6 effective steps of How to Create a Clustered Column Chart in Excel.
Final Words
In the world of Excel, where data reigns supreme, losing valuable work due to an unsaved file mishap can be distressing. However, armed with the knowledge provided in this ultimate guide on how to recover an unsaved Excel file, you can confidently navigate the stormy seas of unsaved files and emerge victorious.
Remember, prevention is better than cure, so make use of the AutoRecover feature and save frequently. But should you find yourself in the unfortunate situation of needing to recover unsaved Excel files, these methods will serve as your trusty lifeboats, ready to rescue your hard-earned work from the depths of digital oblivion.
Moreover, work on these tips provided in this blog so that you can prevent yourself from data loss. I hope this article gives you an ultimate guide on how to recover an unsaved Excel file, how to create a backup in Excel and various tips for data loss. If you find this article interesting do visit again for more related content.
Frequently Asked Questions (FAQs)
1. How can we recover an unsaved Excel file?
Recovering an unsaved Excel file can be a lifesaver when unexpected events like crashes or accidental closures occur. By using various methods you can restore your data such as using autosave and autorecover options, creating a backup, and so on.
2. What are the various tips to prevent future data loss?
There are many number of tips with the use of them you prevent future data loss such as keeping software updated, organising folders, using cloud storage, creating backups, and so on.